

Bulk Metadata
By default, metadata is managed at the page level, but in some cases, it is useful to apply metadata en masse to a website. Common use cases include:
- Default metadata such as
imageshould be applied to the entire website to ensure every page has an image defined. - A certain section of a website should look and feel different from the rest of the website (such as a different template or a theme).
- A certain section of the website should not be indexed or crawled (
robotsset tonoindex).
If you want to create metadata for many pages at once, create a metadata sheet in the root folder of your website content.
- Name the file
metadatain Document Authoring, Google Drive or AEM. - Name the file
metadata.xlsxin SharePoint.
The workbook should have only one sheet and at least two columns like in the following image:
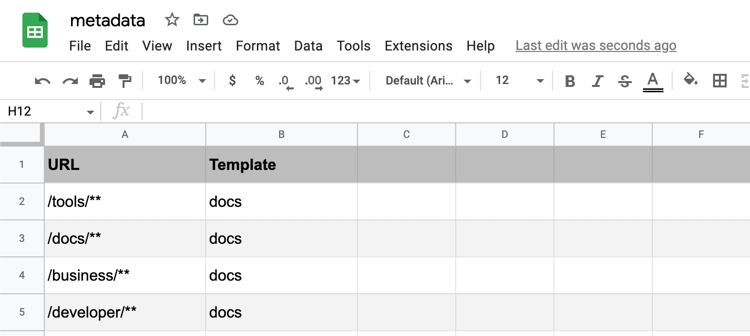
The column titled URL has the URL pattern of the pages that should get a particular metadata entry.
The wildcard * (the asterisk) can be used as a prefix or suffix, allowing for flexible matches on the URL pathname. Typical examples include /docs/** or **/docs/**.
The metadata sheet is evaluated from top to bottom, site wide metadata set to ** must be before more specific entries.
For each metadata property, create a column in the worksheet and name it using the property you want to assign. Typical examples include template, theme, or robots. Property names will be lower-cased in the HTML.
Page-level metadata added via a metadata block takes precedence over bulk metadata. See Page Metadata and Metadata (block) for more information.
Note: You need to preview and publish the metadata sheet in order to see changes reflected on your site.
Omitting Metadata Values
To explicitly remove metadata a "" can be used as a value. This will remove the element or set the corresponding attribute to "" for a particular path.
Example:
URL          Canonical
/**          ""
The example above will remove the <link rel="canonical"> from all pages by default, unless there is a specific override for example from a page metadata block.
Additional Metadata
When metadata is managed by several teams, it is not practical to keep them all in a single metadata file. Multiple metadata files can therefore be optionally configured in the site configuration:
curl -X POST https://admin.hlx.page/config/{org}/sites/{site}/metadata.json \
  -H 'content-type: application/json' \
  -H 'x-auth-token: {your-auth-token}' \
  --data '{
    "source": [
        "/metadata.json",
        "/metadata-2nd.json",
        "/metadata-seo.json"
    ]
}'
The order of the entries in the array dictates the order of how the data is applied. Note that duplicate metadata properties can be overwritten by subsequent sources, but never deleted. In the above example, if the /metadata.json defines a property title, the same property in /metadata-2nd.json will overwrite the value, but only if it is not empty.
Metadata Source Hierarchy
Default hierarchy:
- Page level metadata block wins over
- Folder-mapped metadata* sheet wins over
- Bulk metadata sheet (
/metadata.json)
Hierarchy if there is additional metadata configured:
- Page level metadata block wins over
- Folder-mapped metadata* sheet wins over
- Metadata sheets in configured order
* deprecated
Previous
Page Metadata
Up Next