
How to use Sharepoint (delegated)
NOTE: for projects using Adobe’s Sharepoint (https://adobe.sharepoint.com) please continue here.
If you use SharePoint as your content source, AEM uses a registered Microsoft Azure application to do so. This application has delegated permissions defined that allow the service to access SharePoint on behalf of a user. This user needs to be registered to the project that is using SharePoint.
Alternatively, the services can also authenticate as an application and use application permissions to access the sites. This needs additional setup by a SharePoint site administrator that can grant the permissions for the application.
The preferred setup is to use application permissions, as this narrows down the access the service has to a specific SharePoint site and does not require to share any secrets of a technical user. Also, it reduces the problems around password rotation. Please continue here for instruction on how to do so.
The following describes how to set up delegated permissions for your project.
Setting up SharePoint involves the following steps:
- Create a folder within SharePoint that will be the website root.
- Create or define the (technical) user that will access the SharePoint content
- Share the website root folder with that user.
- Configure the
fstab.yamlwith the respective folder - Register the user with the service
1. Create the website root folder
Navigate to your desired location in SharePoint and create a root folder that will be your website root. It is best to not use a SharePoint list root directly, so that you have a shared space for your authors to put collateral documents, for example a drafts folder, or how-to-author documentations.
An example file structure might look like this, using the website folder as the root:

2. Create or define the user
It is best practice to use a generic (or technical) user to access the content on behalf of the service. This is better than using an employee user account because the exact scope of the files the user can access can be defined. Furthermore, there is no risk losing access to the files, should that employee leave the company.
Every company has different procedures to create technical users, so ask your IT department on how to do this.
3. Share the website root folder
NOTE: for projects using Adobe’s Sharepoint (https://adobe.sharepoint.com) please see here.
Ensure that the service user has edit rights on the website root folder. This can be achieved easily by clicking on the … ellipsis menu and selecting “Manage Access”.

And then add the generic (or technical) user user via the “Direct access” option.

4. Configure the fstab.yaml
The next step is to configure the mountpoint in the fstab.yaml to point to the website root. It usually has the form of
https://<tenant>.sharepoint.com/sites/<sp-site>/Shared%20Documents/website
But this might vary depending on how you create the SharePoint site and lists. In order to obtain the url, the simplest way is to copy-past the first part from the browser address, eg:

And then add the rest manually (Note, that copying the sharelink via the UI adds unnecessary information and it is better to use a canonical representation of the url). Once you composed the url, you can test it by entering it again in the browser. You should end up in the folder view of your website root.
After that, update the fstab.yaml accordingly.
For example:
mountpoints:
  /: https://adobeenterprisesupportaem.sharepoint.com/sites/hlx-test-project/Shared%20Documents/website
To finalize the configuration, commit the fstab.yaml back to the main branch.
5. Register the user
Overview
In order for the AEM service to access the authored content it needs a couple of information and setup. The AEM service (a cloud function) accesses the MS Graph API on behalf of a configured user. In order to do so, it needs to authenticate first in the context of an Application. This is important because the scopes given to the application define what permission the service has on the MS Graph API. For example, it should be allowed to read and write documents, but not to alter access control.
An application is represented as an “Enterprise Application” in the respective Active Directory of a tenant. The permissions given to that enterprise application ultimately define what the service can access in that tenant’s resources. Certain permissions need to be approved by an Active Directory administrator before a user can use the application. This so-called “admin consent” is a mechanism to verify and control which permissions apps can have. This is to prevent dubious apps from tricking users into trusting an app that is not official. Having the extra admin consent step allows IT security to control which apps the employees can use.
1. Sign-in in the Registration Portal
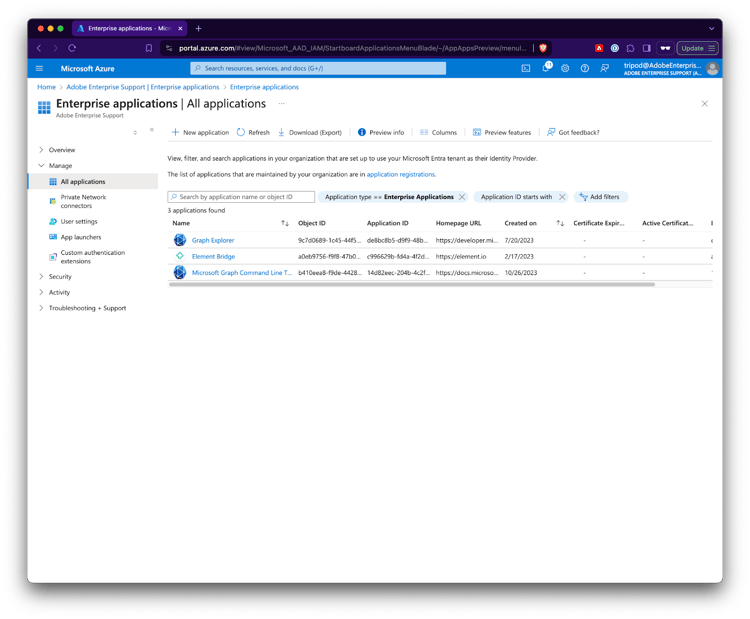
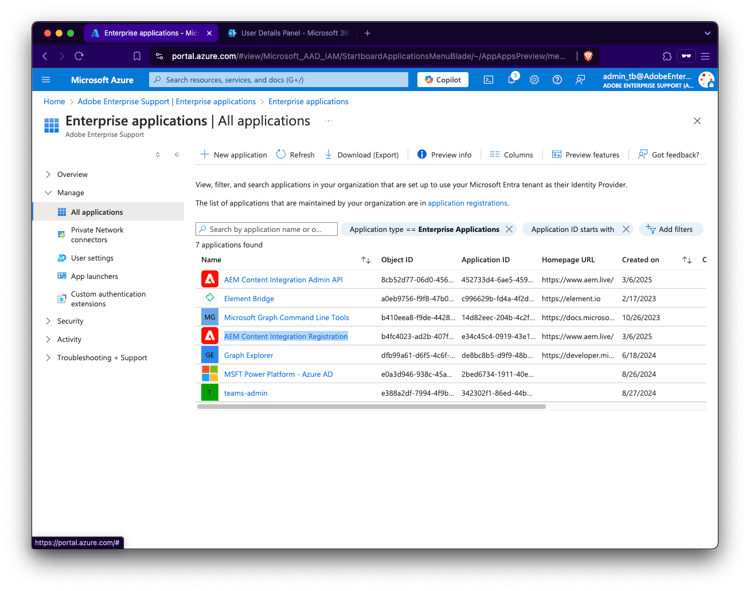
View Enterprise Applications in Azure Portal
Assuming that so far no AEM Enterprise Applications are present in Azure (Microsoft Entra Id)
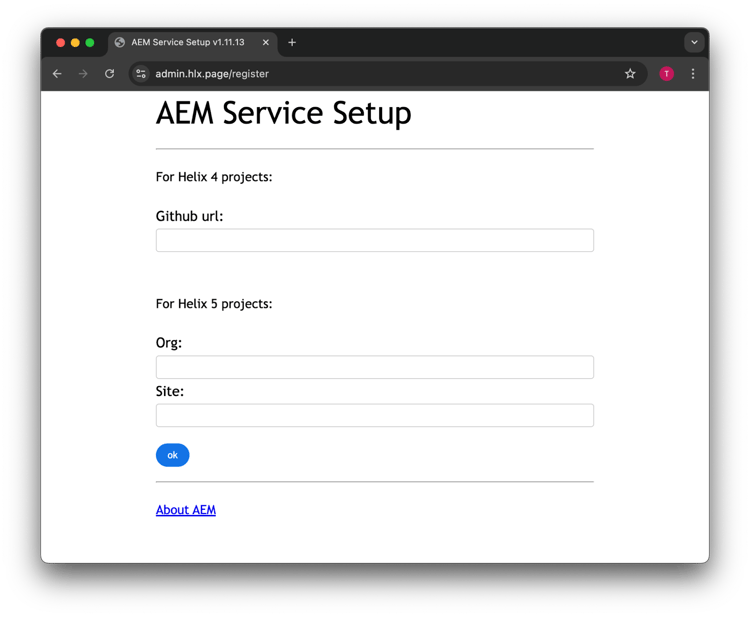
Access The Registration Portal
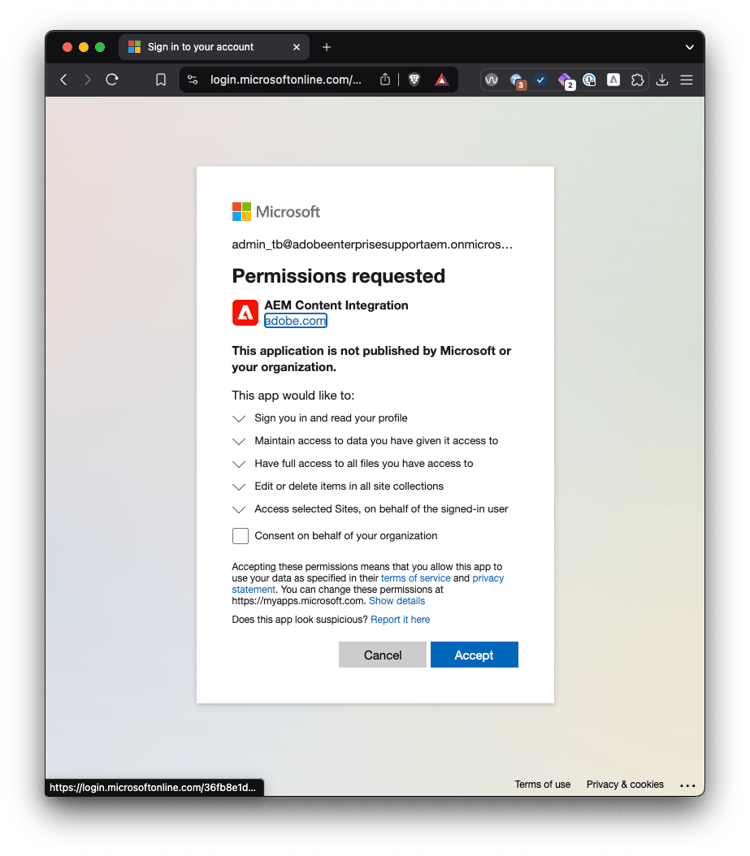
Go to https://admin.hlx.page/register, enter the github url of the project or the org/site values of your site config.
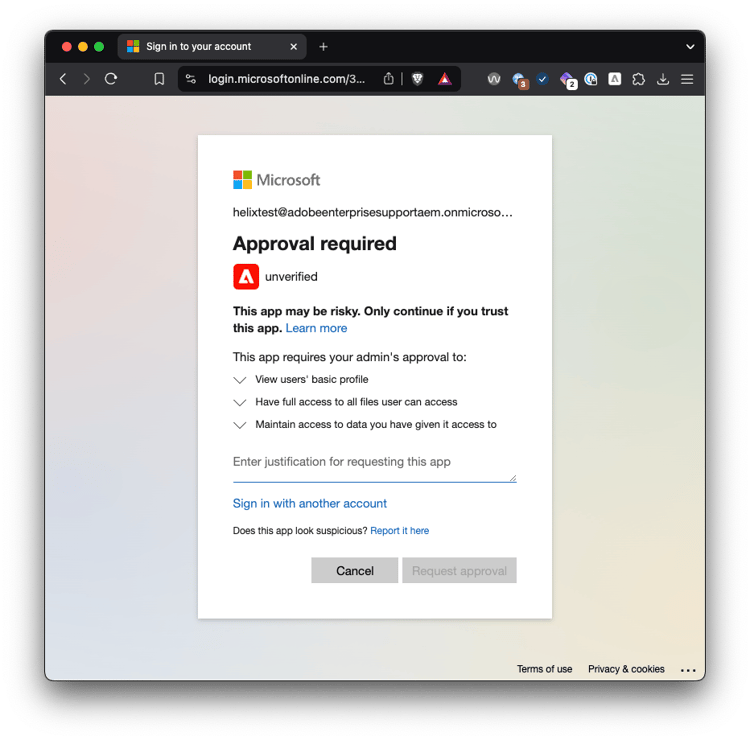
Sign-in as non admin user
Sign in as a user that does not have admin permissions will show an error that it needs approval, i.e. the application needs admin consent.
Problem: Enterprise Application is not registered if a user never logs in.
Sign-in as admin user
One solution is to sign in as a user that does have admin permissions:
(note, at this point the Enterprise Application is still not registered in azure)
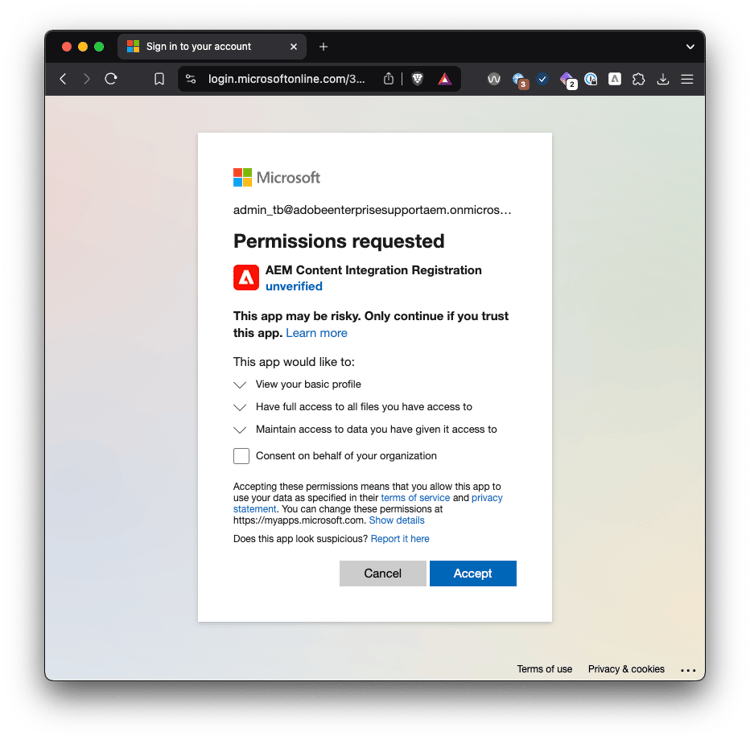
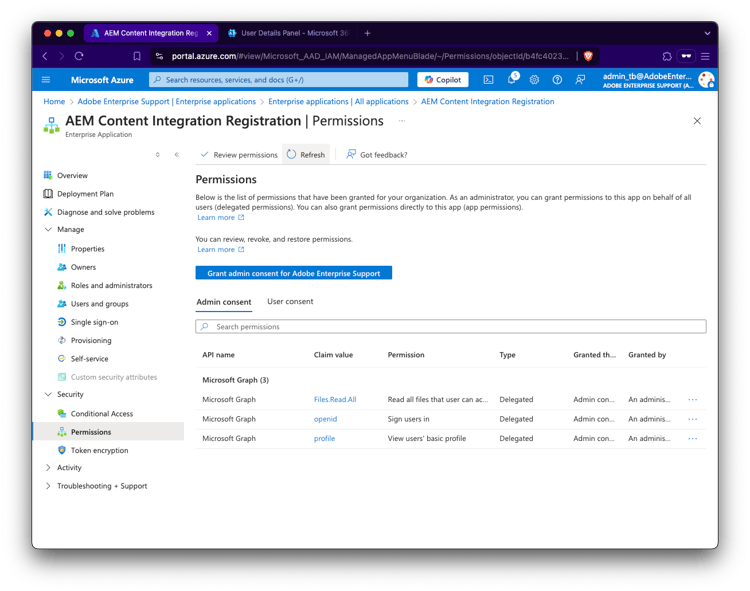
AEM Content Integration Registration visible in UI
If the admin logs in (without checking the checkbox and granting consent for everyone), the Enterprise application is present.
Create application using MSGraph or Powershell
Alternatively, you can create the Enterprise application via MSGraph or Powershell.
In order to make it visible in the azure UI you also need to add the WindowsAzureActiveDirectoryIntegratedApp tag. This can be done directly when creating the application.
Using graph explorer:
POST https://graph.microsoft.com/v1.0/servicePrincipals
Content-type: application/json
{
    "appId": "e34c45c4-0919-43e1-9436-448ad8e81552",
    "tags": [
        "WindowsAzureActiveDirectoryIntegratedApp"
    ]
}
Using powershell:
PS> connect-MgGraph -Scopes "Application.ReadWrite.All"
PS> New-MgServicePrincipal -AppId e34c45c4-0919-43e1-9436-448ad8e81552 -Tags WindowsAzureActiveDirectoryIntegratedApp
After that you still need to give admin consent, if you want a non admin user to login.
Also see:


Review permissions
Note that the AEM Content Integration Registration (e34c45c4-0919-43e1-9436-448ad8e81552) application is only needed during registration to verify that the user has read access to the sharepoint. It has the following delegated permissions:
Openid
Allows users to sign in to the app with their work or school accounts and allows the app to see basic user profile information.Profile
Allows the app to see your users' basic profile (e.g., name, picture, user name, email address)Files.ReadWrite.All
Allows the app to read, create, update and delete all files the signed-in user can access.
User logged in Registration portal
After completing this initial step, the user is logged in the registration portal
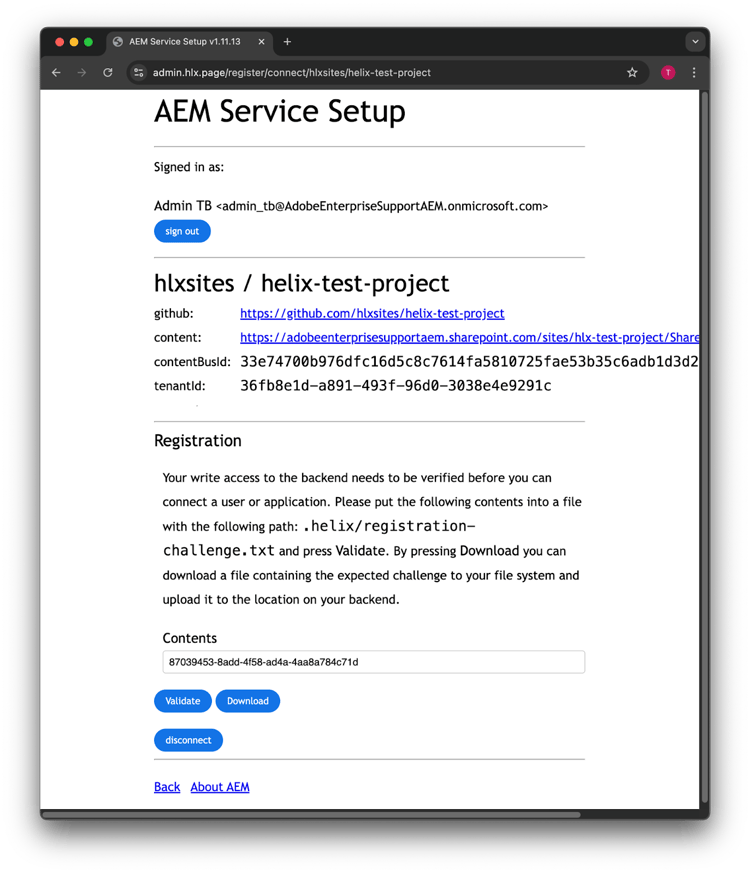
Verify write access to the content source via challenge file
Download the challenge file
Before you can register (or change) the registration. You have to prove that you have write access to the respective sharepoint location. For that you need to upload a text file containing the mentioned content. This can easily be done by downloading the file and drop it into the sharepoint folder.
After that, click on Validate to continue the registration.

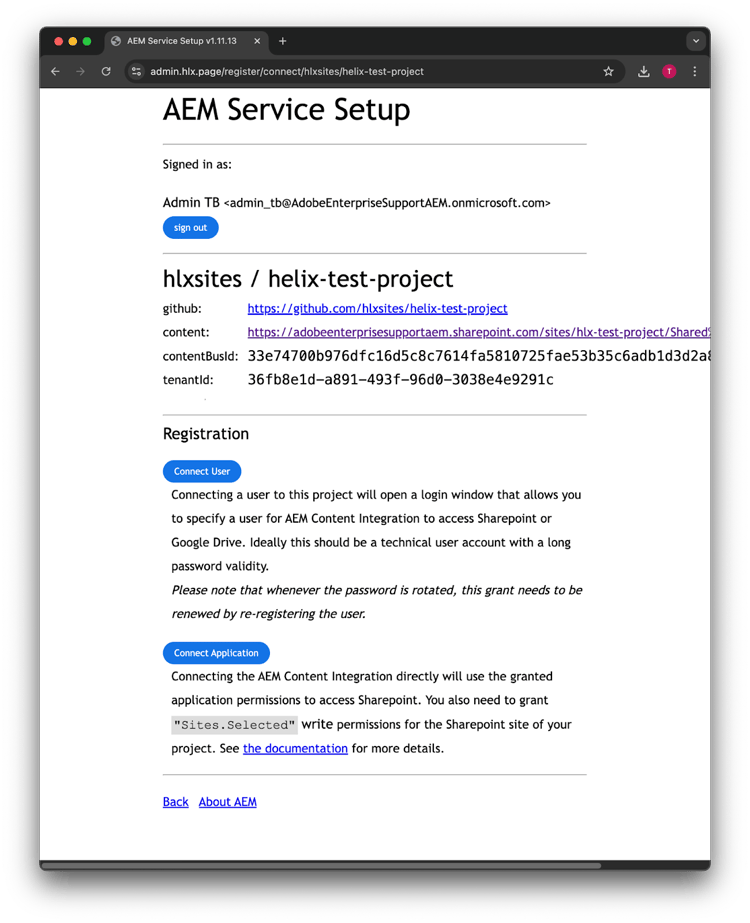
Connect the technical User


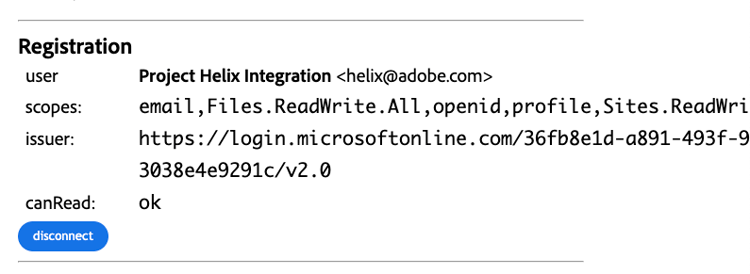
Once the user is registered, you should be able to preview a page.
Important
Changing the user's password will invalidate the grant that is established when connecting the user. This will eventually cause an error in the sidekick. In order to prevent this, you need to reconnect the user, by clicking the disconnect button then connect it again.