Permissions view
The permissions view is a central interface where you can manage permissions for your organization and across your sites.
Understanding permissions
Experience Workspace and Edge Delivery Services allow fine-grained control of access to configurations, folders, and resources. Please see the document Permissions for details on how permissions work and for examples.
Accessing the permissions view
When you browse your content, you can always access your configurations as well as permissions by clicking the gear at the end of the breadcrumbs.
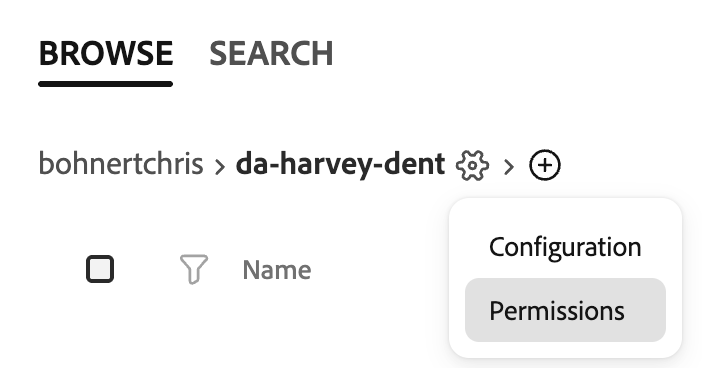
Selecting Permissions at the level of a site will open the permissions view and automatically filter the permissions for that path. Selecting permissions at the level of the organization will by default show only the organization permissions.
The permissions view
The permissions view is divided into three sections:
- The filter field allows you to filter for users or folders, which can be useful when you manage many permissions.
- The site switcher allows you to filter folder permissions for a particular site or only for the organization.
- Depending on from where you open the permissions view, the switcher may be set to a particular site when the permissions view opens.
- The Permissions list displays the filtered permissions and allows you to modify them.
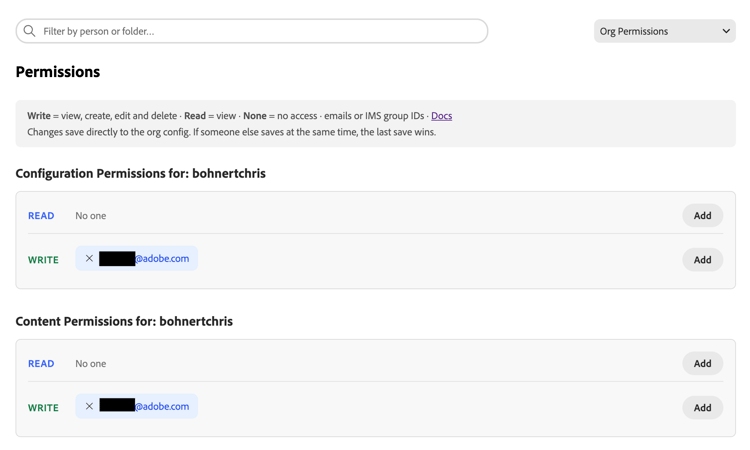
Permissions list
The permissions list is divided into three sections:
- Configuration Permissions allow you to define who can modify configurations for the organization or site.
- Content Permissions allow you to define who can modify content for your organization or site.
- Folder Permissions allow you to define access to specific paths of a site.
- Folder permissions are only shown if you have used the site switcher to select a site.
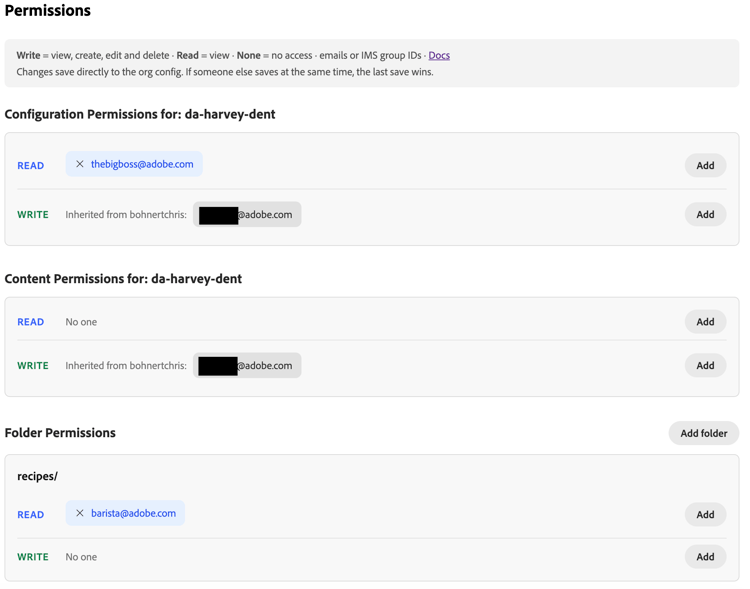
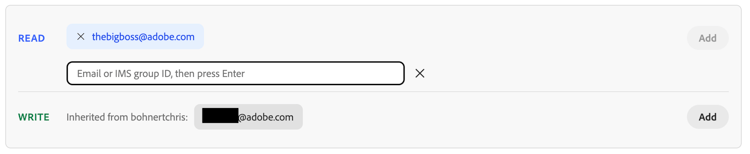
Permissions are always grouped as READ or WRITE.
- READ = view
- WRITE = View, create, edit, and delete
- None = No access
Configuration permissions and content permissions always indicate for which organization or site they apply (e.g. Configuration Permissions for: da-harvey-dent as illustrated).
Configuration permissions and content permissions reflect permissions that are inherited from the organization as well as those applied to a particular site.
Adding permissions
Simply click Add within the READ or WRITE group to add a configuration or content permission. An entry field is revealed where you can specify an email address or IMS org ID and press enter on your keyboard to save.
Click Add folder to add a folder permission. You will first need to specify a folder path before entering an email address or an IMS org ID and saving with enter.
Deleting permissions
Click the X next to the email address or IMS org ID to remove its permissions. This change is saved automatically.
Inherited permissions can not be deleted from sites that inherit them and must be deleted at the organization level.
How permissions are saved
The permissions view offers a convenient way to manage your permissions. However all permissions data are saved as entries on the permissions tab of the organization configuration.
This means you can manage your permissions either as part of the configuration or in the permissions view, whichever suits you best. The two methods can be used interchangeably, but the last save wins.